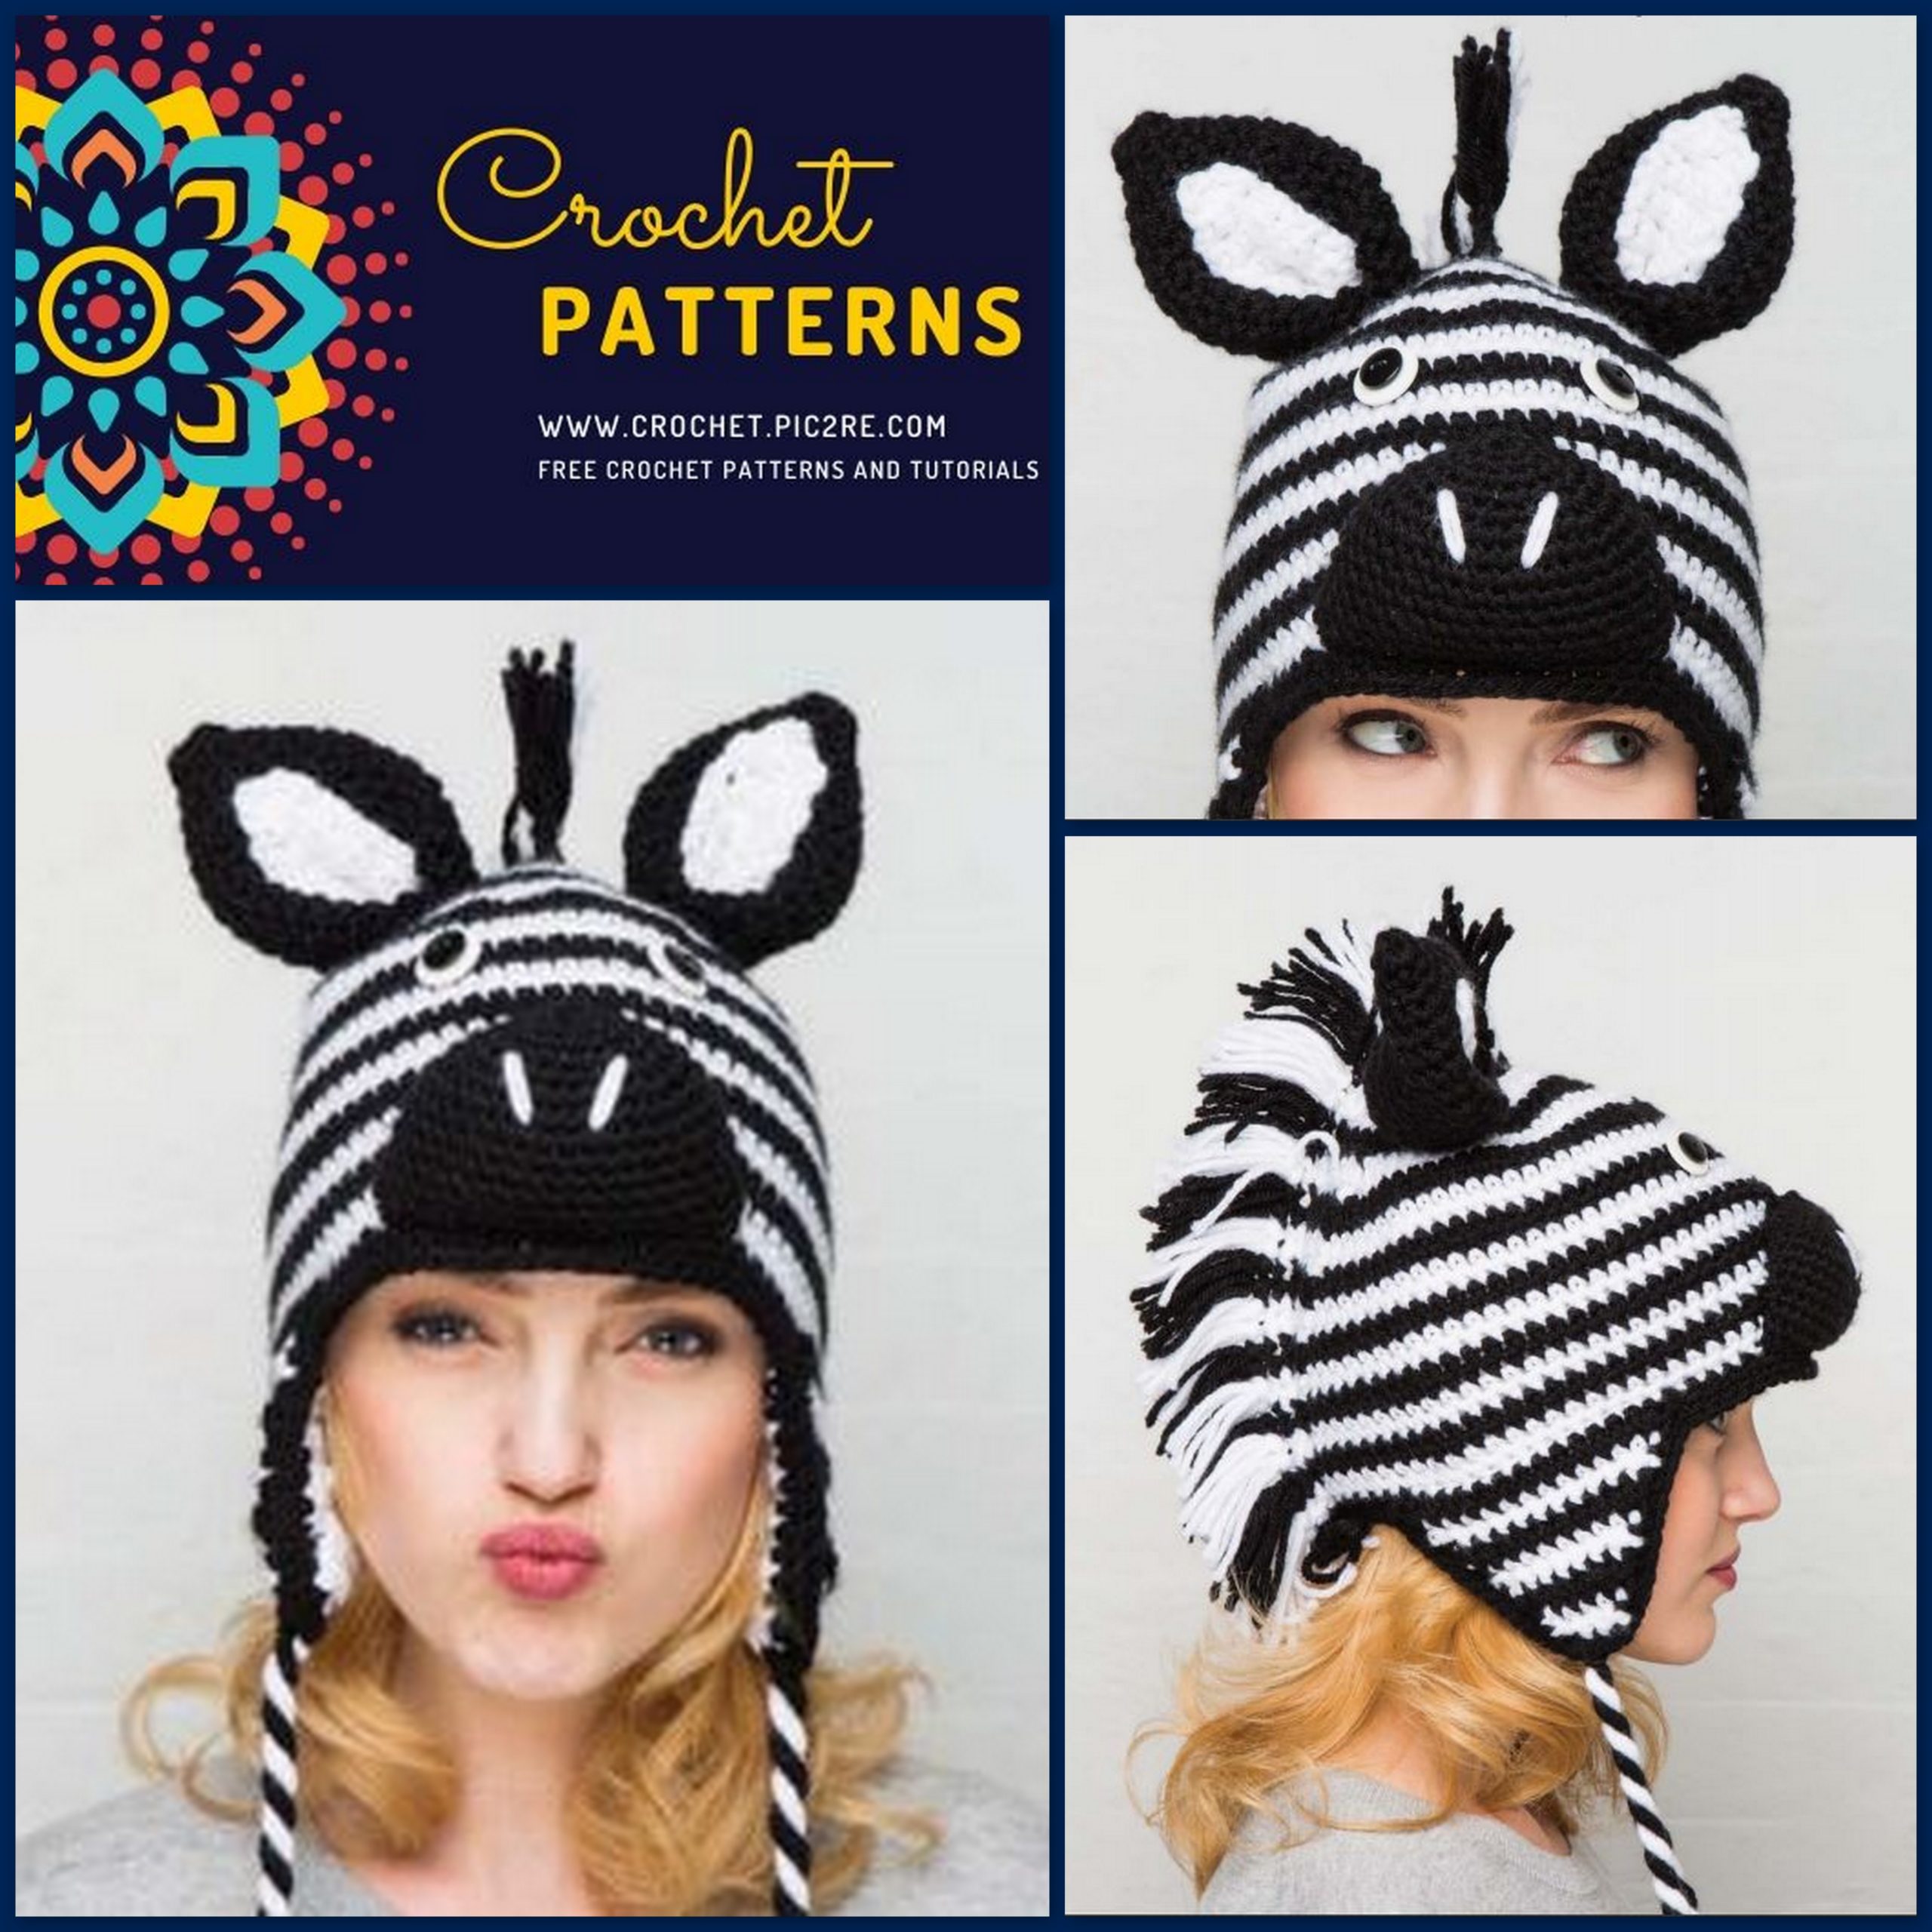
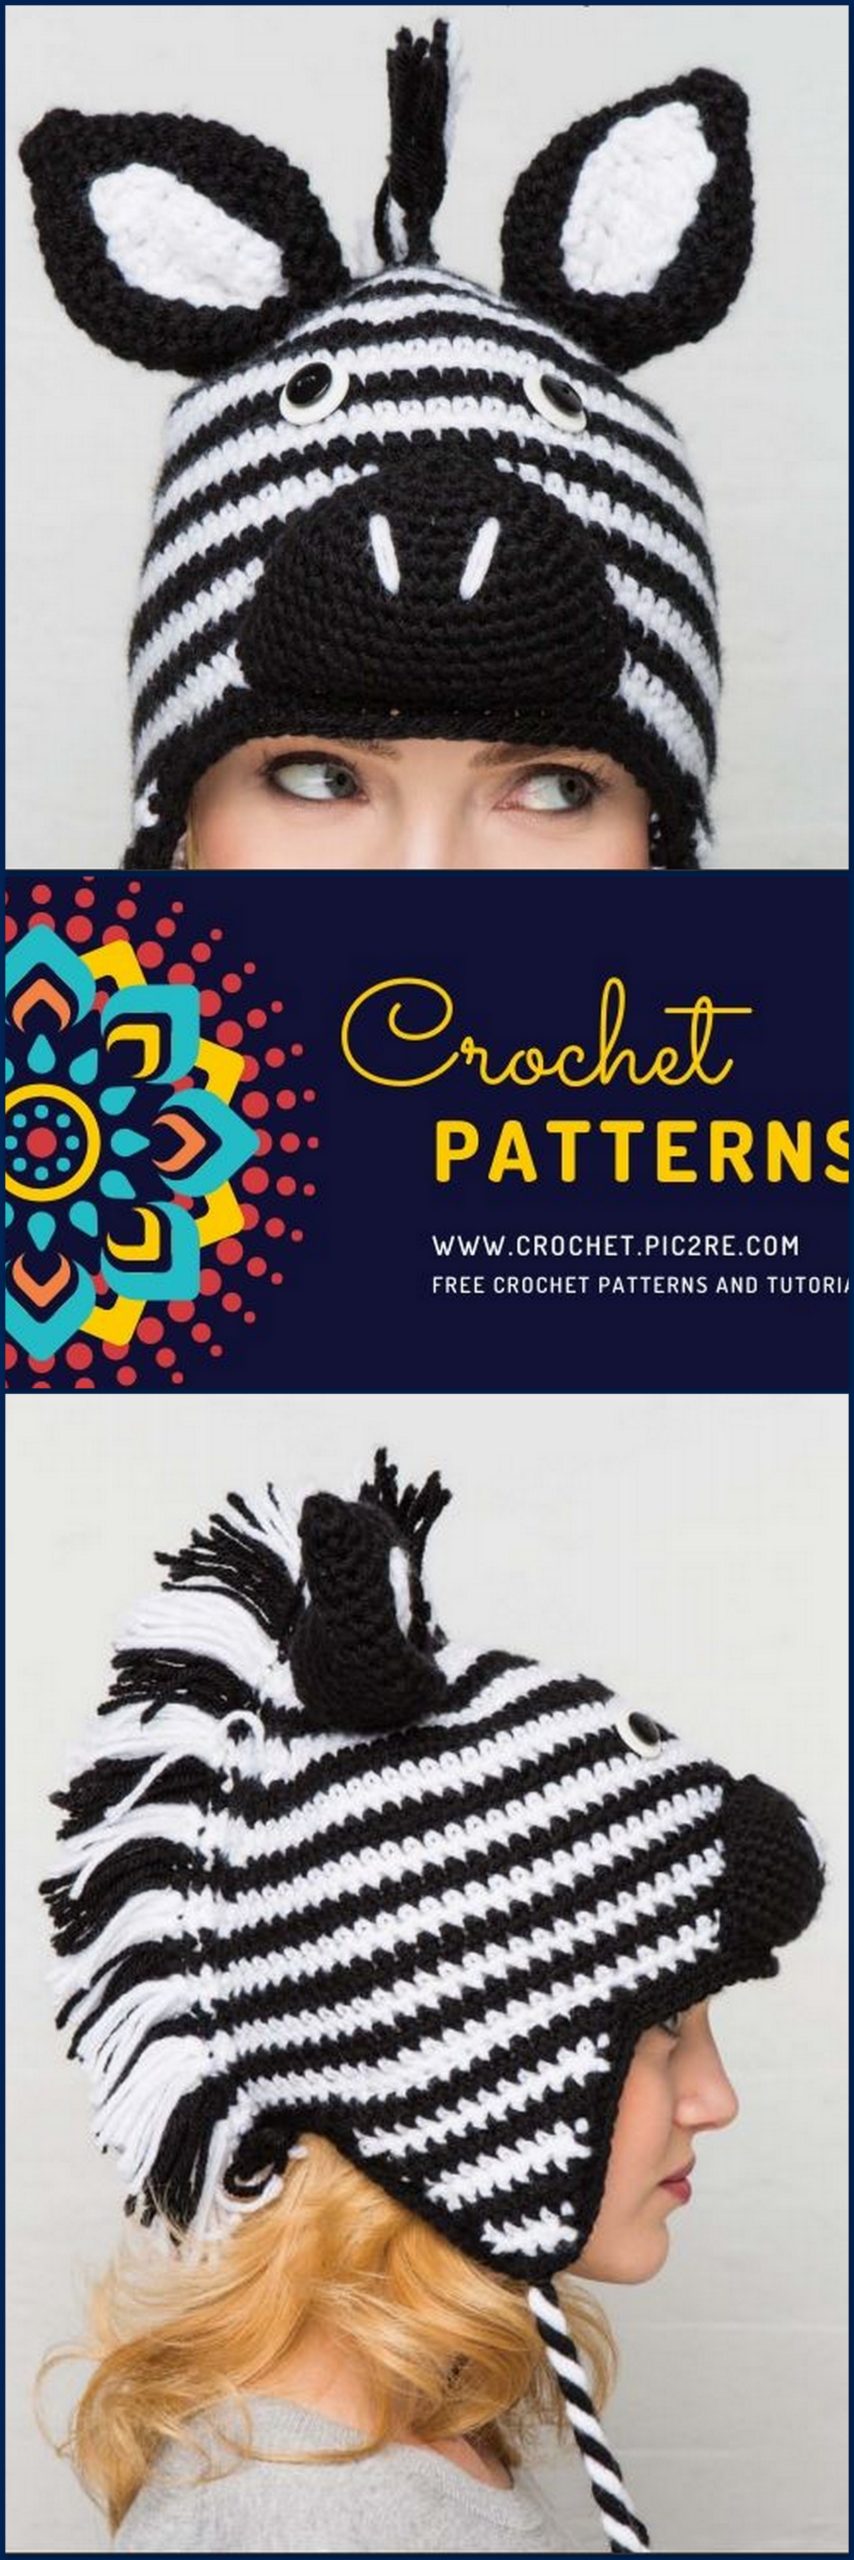
Amigurumi Zebra Beret Free Crochet Pattern
We share a beautiful beret pattern for both adults and children. It will protect your head and ears from the cold in winter. Follow us for Amigurumi leopard beret pattern and more patterns.
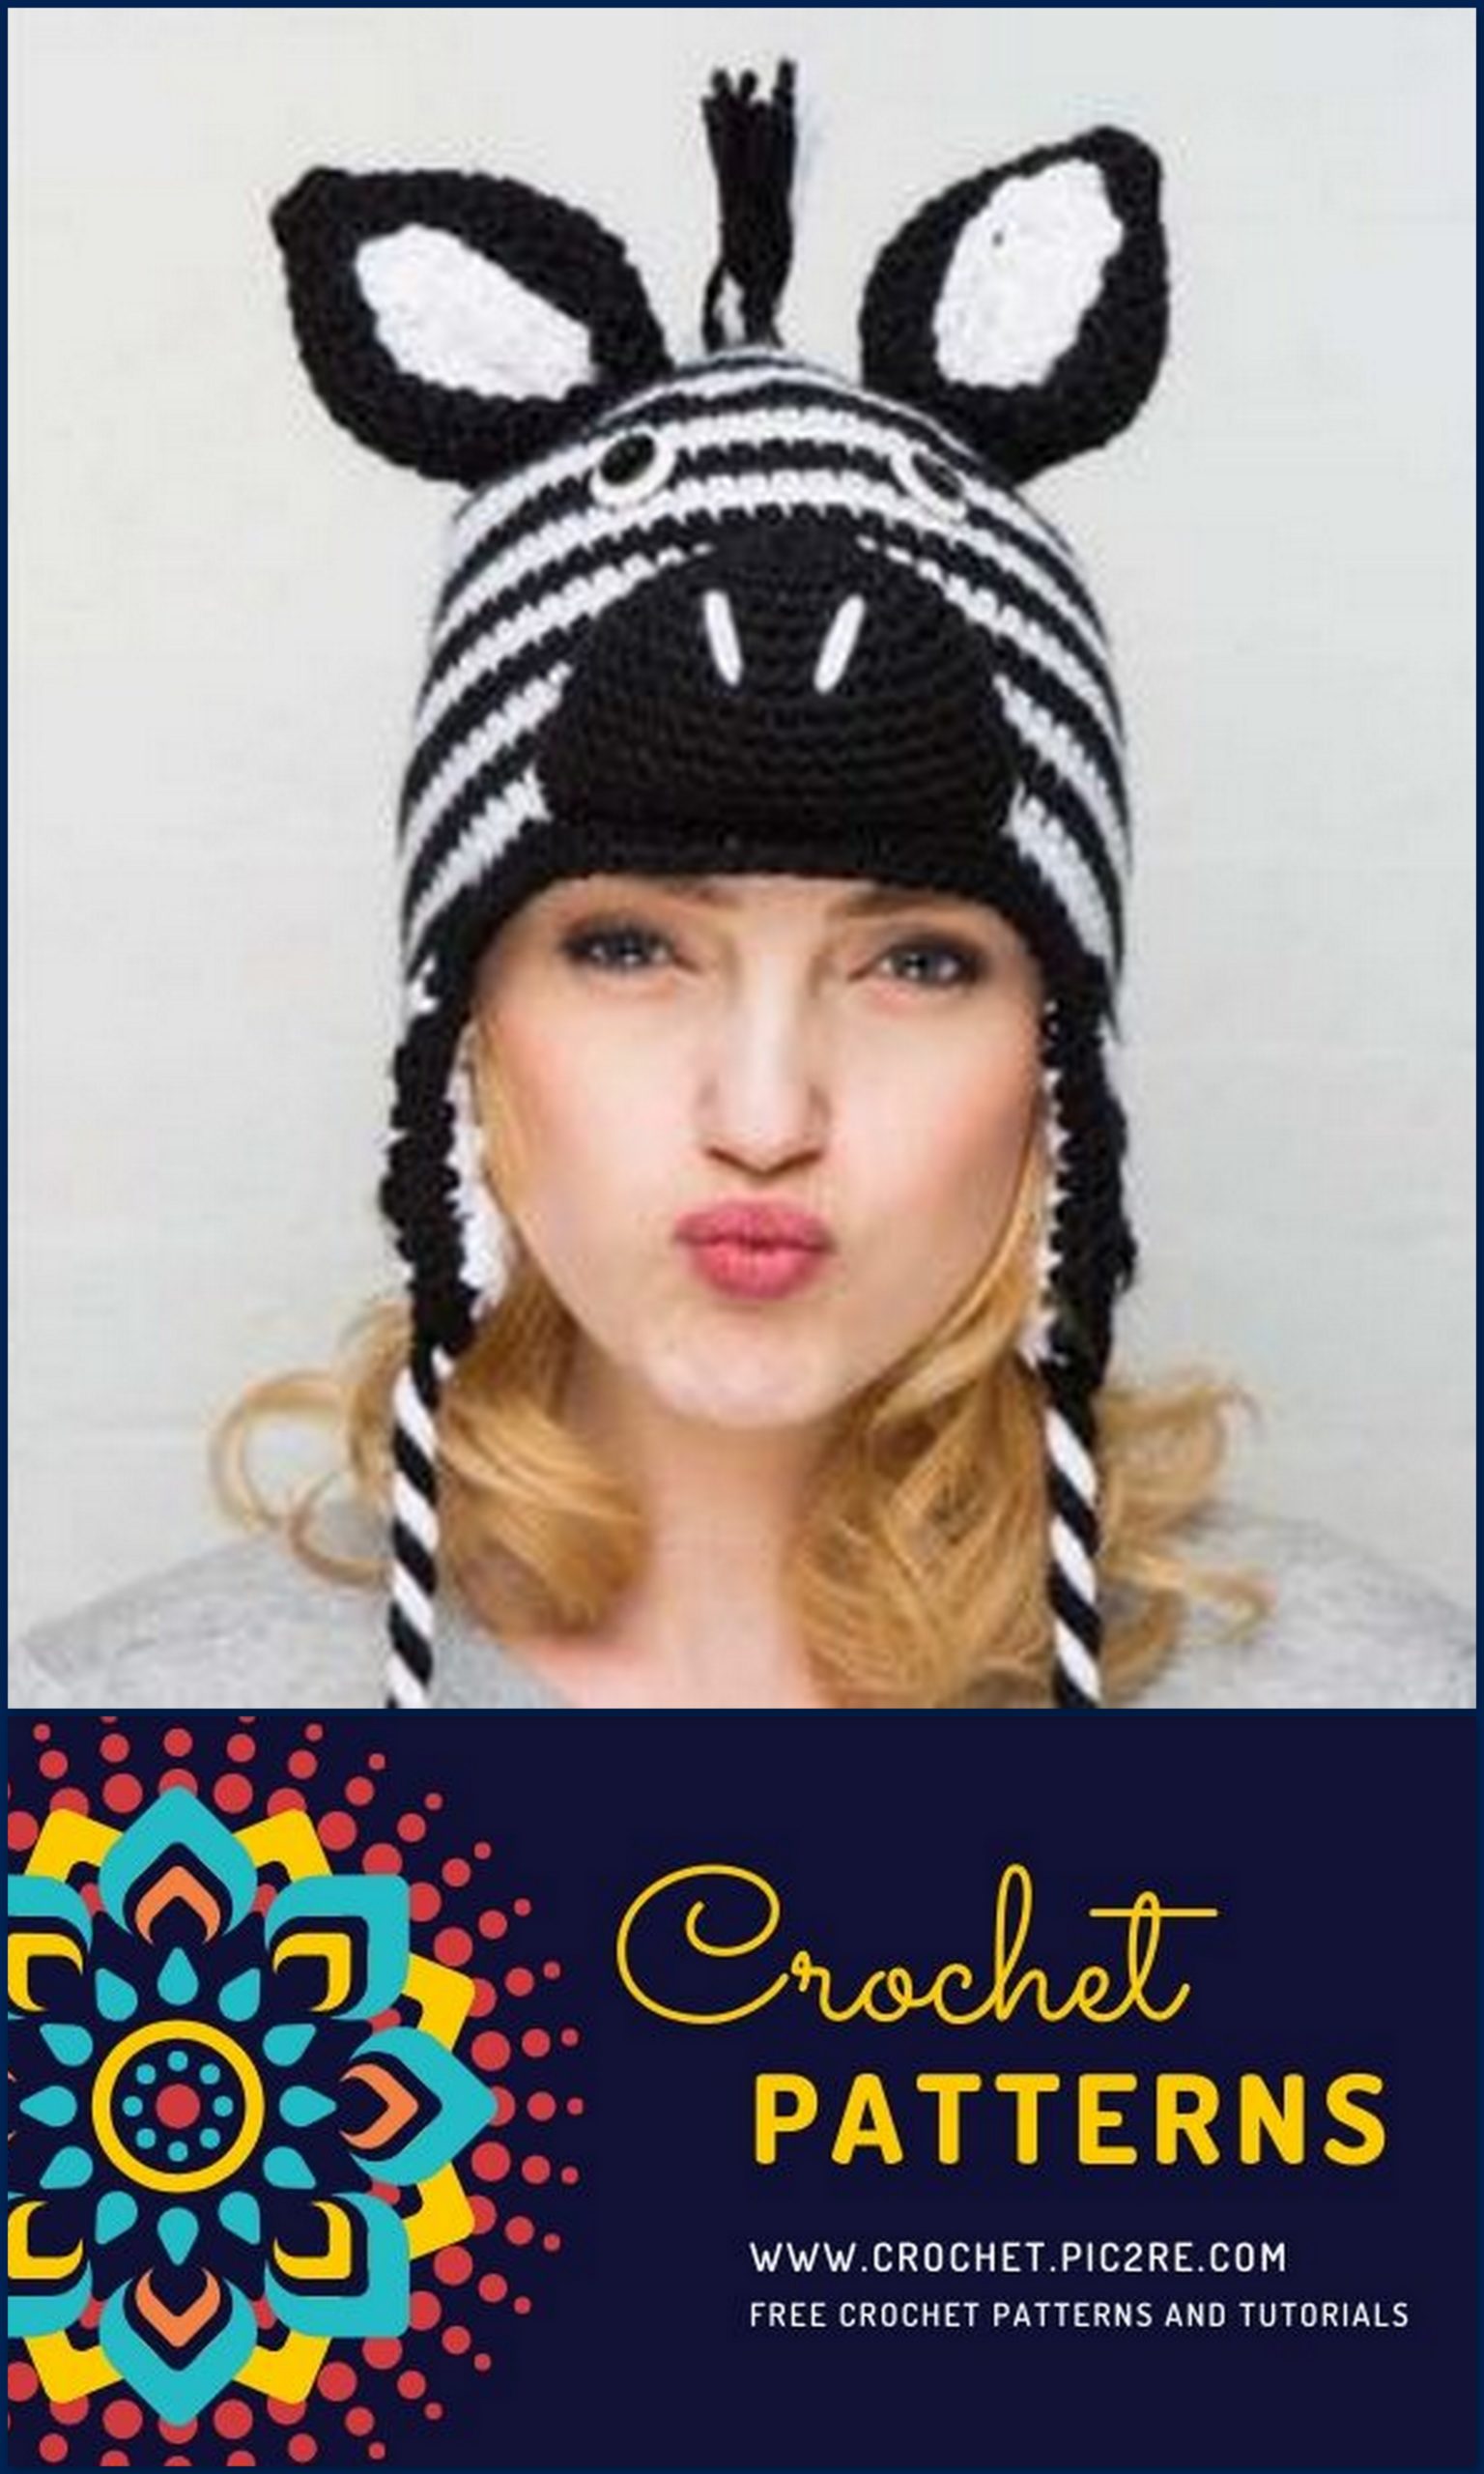
This smart zebra hat in monochrome stripes with its matching fringed mane and twisted cords is great fun to wear. The detailed ears and nose with its embroidered nostrils make it especially cute.
MATERIALS
James C Brett Chunky with Merino, 70% acrylic, 20% siliconized soft polyamide, 10% merino wool (164yd/150m per 100g ball)
1[1] x 100g ball in CM1 (A)
2[2] x 100g balls in CM2 (B)
4.5mm (UK7:US7), 5mm (UK6:USH/8) and 6mm (UK4:USJ/10) crochet hooks
2 x white ¾[⅞]in (2[2.25]cm) diameter buttons
2 x black ½[⅝]in (1.25[1.5]cm) diameter buttons
Darning needle
Sewing needle
Black thread
Small amount of toy stuffi ng Thin card to make tassels
SIZES
To fi t: child, up to 20in (51cm) head circumference [adult, up to 22in (56cm) head circumference]
TENSION
13 sts and 14 rows to 4in (10cm) over double crochet on 6mm hook. Use larger or smaller hook if necessary to obtain correct tension.
METHOD
The stripes are produced by alternating yarns every two rows. The black part of the ears is worked in rounds of double crochet with the white inners worked separately in rows and stitched on. The nose is crocheted using a smaller hook to create a fi rmer fabric and then stuff ed to give it shape and fi nished with embroidered nostrils. A striped band worked in rows of double crochet with a fringe attached to one long edge forms the zebra’s mane, which is stitched to the top and down the back of the hat.
MAIN PIECE
Both sizes
Starting at the top of the hat, with 6mm hook and A, make 4 ch and sl st to fi rst ch to form a ring. Round 1: 1 ch (does not count as a st), work 6 dc into ring, sl st into fi rst dc (6 sts).
Round 2 (inc): 1 ch (does not count as a st), (dc2inc) 6 times, sl st into fi rst dc (12 sts). Join in yarn B.
Round 3 (inc): With B, make 1 ch (does not count as a st), (dc2inc, 1 dc) 6 times, sl st into fi rst dc (18 sts).
Round 4 (inc): 1 ch (does not count as a st), (dc2inc, 2 dc) 6 times, sl st into fi rst dc (24 sts).
Round 5 (inc): With A, make 1 ch (does not count as a st), (dc2inc, 3 dc) 6 times, sl st into fi rst dc (30 sts).
Round 6 (inc): 1 ch (does not count as a st), (dc2inc, 4 dc) 6 times, sl st into fi rst dc (36 sts).
Round 7 (inc): With B, make 1 ch (does not count as a st), (dc2inc, 5 dc) 6 times, sl st into fi rst dc (42 sts).
Round 8 (inc): 1 ch (does not count as a st), (dc2inc, 6 dc) 6 times, sl st into fi rst dc (48 sts).
Continue, following the pattern from round 9 of the leopard hat on page 14, alternating yarn A and B as before and fi nishing the last round of the child size in B and the last 2 rounds of the adult size in A.
First earflap
Both sizes
Next: With B, starting at the centre back, 1 ch (does not count as a st), work 1 dc in next 5[6] dc.
The following is worked in rows:
Row 1 (RS): With B, work 1 dc in next 13[15] dc, turn.
Adult size only
Next (WS) (dec): With B, make 1 ch (does not count as a st), dc2dec, 1 dc in next 11 dc, dc2dec, turn, 1 ch (does not count as a st). Join in yarn A.
Next: With A, work 1 dc in next 13 dc, turn.
Both sizes
Next (dec): Continue as before, following the earfl ap pattern from * to * on page 16, and at the same time changing colour every two rows. Work the last row of the earfl ap in child size in B.
Fasten off .
Second earflap
Next: With right side facing, rejoin B to the front of the hat. Work 1 dc in each of the 24 dc across the front of the hat. Complete the second earfl ap, following the pattern as for the leopard on page 16 and alternating the colours so the stripes match the fi rst earfl ap.
EARFLAP FACINGS (MAKE 2)
Omit if you plan to add a crocheted lining.
Both sizes
With 6mm hook and A, follow the earfl ap facing pattern as for the leopard hat on page 18.
Edging
With 5mm hook and B, follow the edging pattern for the earfl ap facing on page 18.
EARS (MAKE 2)
Both sizes
Starting at the top of the ear, with 6mm hook and B, make 4 ch and sl st to fi rst ch to form a ring.
Follow the instructions and the chart as for the giraff e ears on page 116. Fasten off , leaving a long length of yarn.
INNER EARS (MAKE 2)
Both sizes
With 6mm hook and A, make 2 ch.
Row 1: Work 3 dc into second ch from hook, turn (3 sts).
Row 2: 1 ch (does not count as a st), work 1 dc in each dc, turn.
Row 3 (inc): 1 ch (does not count as a st), dc2inc, 1 dc, dc2inc, turn (5 sts).
Row 4: As row 2.
Row 5 (inc): 1 ch (does not count as a st), dc2inc, 1 dc in next 3 dc, dc2inc, turn (7 sts).
Row 6: As row 2.
Adult size only
Next (inc): 1 ch (does not count as a st), dc2inc, 1 dc in next 5 dc, dc2inc, turn (9 sts).
Both sizes
Next: As row 2.
Next: Rep last row 1[3] more times.
Fasten off , leaving a long length of yarn at the end.
NOSE
Both sizes
With 4.5mm hook and B, make 4 ch and join with a sl st to the fi rst ch to form a ring.
Round 1: 1 ch (does not count as a st), work 6 dc into ring, sl st to fi rst dc (6 sts).
Round 2 (inc): 1 ch (does not count as a st), (dc2inc) 6 times, sl st into fi rst dc (12 sts).
Round 3 (inc): 1 ch (does not count as a st), (dc2inc, 1 dc) 6 times, sl st into fi rst dc (18 sts).
Round 4 (inc): 1 ch (does not count as a st), (dc2inc, 2 dc) 6 times, sl st into fi rst dc (24 sts).
Round 5 (inc): 1 ch (does not count as a st), (dc2inc, 3 dc) 6 times, sl st into fi rst dc (30 sts).
Adult size only
Next (inc): 1 ch (does not count as a st), (dc2inc, 4 dc) 6 times, sl st into fi rst dc (36 sts).
Both sizes
Next round: 1 ch (does not count as a st), work 1 dc in each dc, sl st to fi rst dc.
Rep last round 4[6] more times.
Fasten off , leaving a long length of yarn at the end.
MANE
With 6mm hook and B, make 3 ch.
Row 1: Work 1 dc into second ch from hook, 1 dc in next ch, turn (2[2] sts).
Row 2: 1 ch (does not count as a st), work 1 dc in each dc, turn. Join in A and rep row 2 twice.
Using yarn B, rep row 2 twice. Continue in this way, working 2 rows of double crochet and at the same time alternating yarn A and B to create the stripes until you have completed 30[34] rows. Fasten off .
MAKING UP
Edging
With right side of work facing, using 5mm hook and B, rejoin yarn to the back of the hat by the second earfl ap and follow the edging pattern as for the leopard hat on page 23. Fasten off and slip stitch the top edge of the earfl ap facings to the inside of the main piece using yarn A.
Ears
Push a thin layer of stuffi ng into the ears, keeping the shape flat. With the long length of yarn left, sew the stitches from each side of the last round together to join, forming a straight edge. Sew the inner ear to the centre of the ear and aligning the lower edges. Bring each corner of the ear to the middle to shape and stitch together. Sew in place to each side of the head, stitching all around the lower edges to prevent them from fl opping over.
Nose
Stuff the nose lightly to pad it out, keeping a fl attened shape. Sew the stitches from each side of the last round together to form a straight edge. Stitch the nose in place on the front of the hat with the straight edge sitting just above the second row of edging stitches. Using yarn A and a blunt-ended darning needle, embroider the nostrils by working 2 straight stitches (see page 155) for each.
Eyes and mane
Place the small black buttons over the larger white buttons and sew in place for the eyes. To make the fringe of the mane, cut 14[16] sets of three 6in (15cm) lengths in yarn A and 16[18] sets of three lengths in B. Attach to the mane by folding three lengths in half to form a loop, inserting the crochet hook into the fi rst stitch of the fi rst stripe at the long edge and catching the looped yarn (see 1). Pull the loop a little way through, remove the hook and then thread the ends back through the loop, pulling them tight (see 2). Repeat to the end of the mane, attaching one tassel to the edge of each row and matching the colours of the stripes. Trim the ends of the fringe and sew in place, starting at the lower edge of the back, matching the stripes up the centre back of the hat and ending at the second round at the front of the hat.
Finishing touches
If making a crocheted lining, attach the twisted cords to the hat after inserting the lining. Weave in all the yarn ends. Make two 8[12]in (20[30]cm)-long striped twisted cords (see page 154) using 3[4] strands each of yarn A and B. Make two tassels (see page 155) measuring 4[5⅛]in (10[13]cm) long in B, and attach each to one end of the twisted cord, then stitch the other end of the cord to the tip of the earfl ap.
LINING
See pages 142–5 for how to make and attach a cosy fleece or crocheted lining.