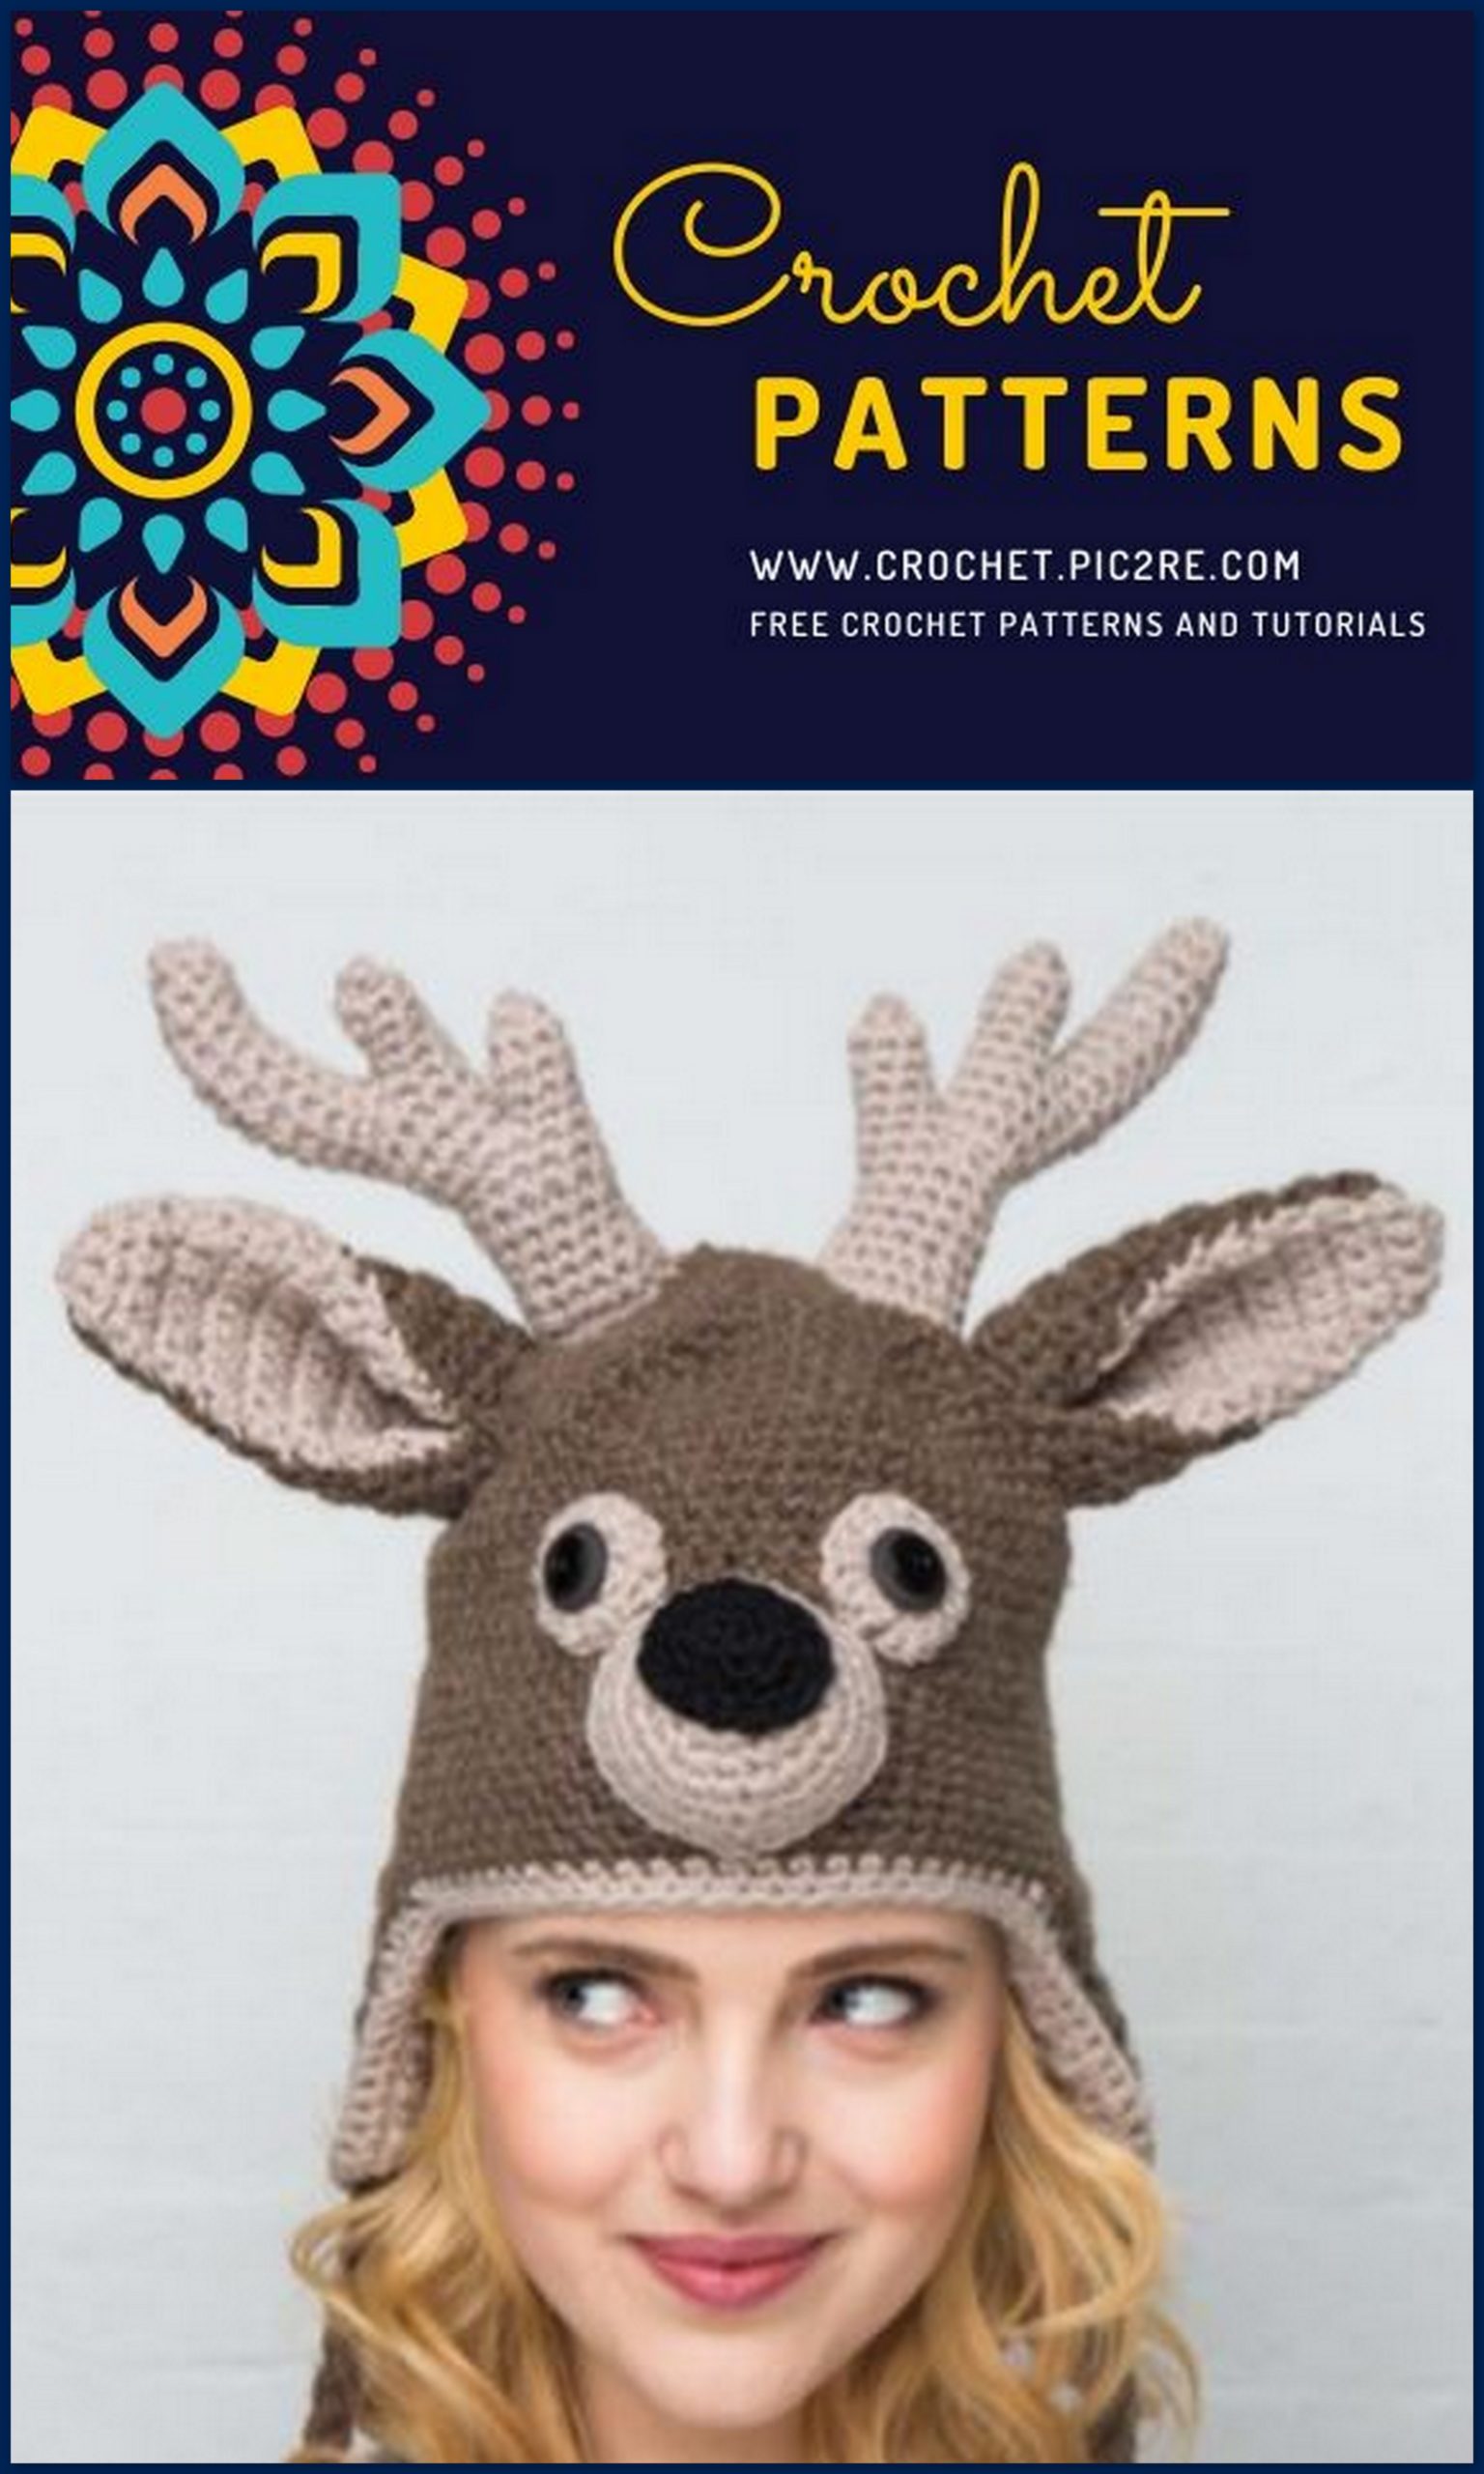
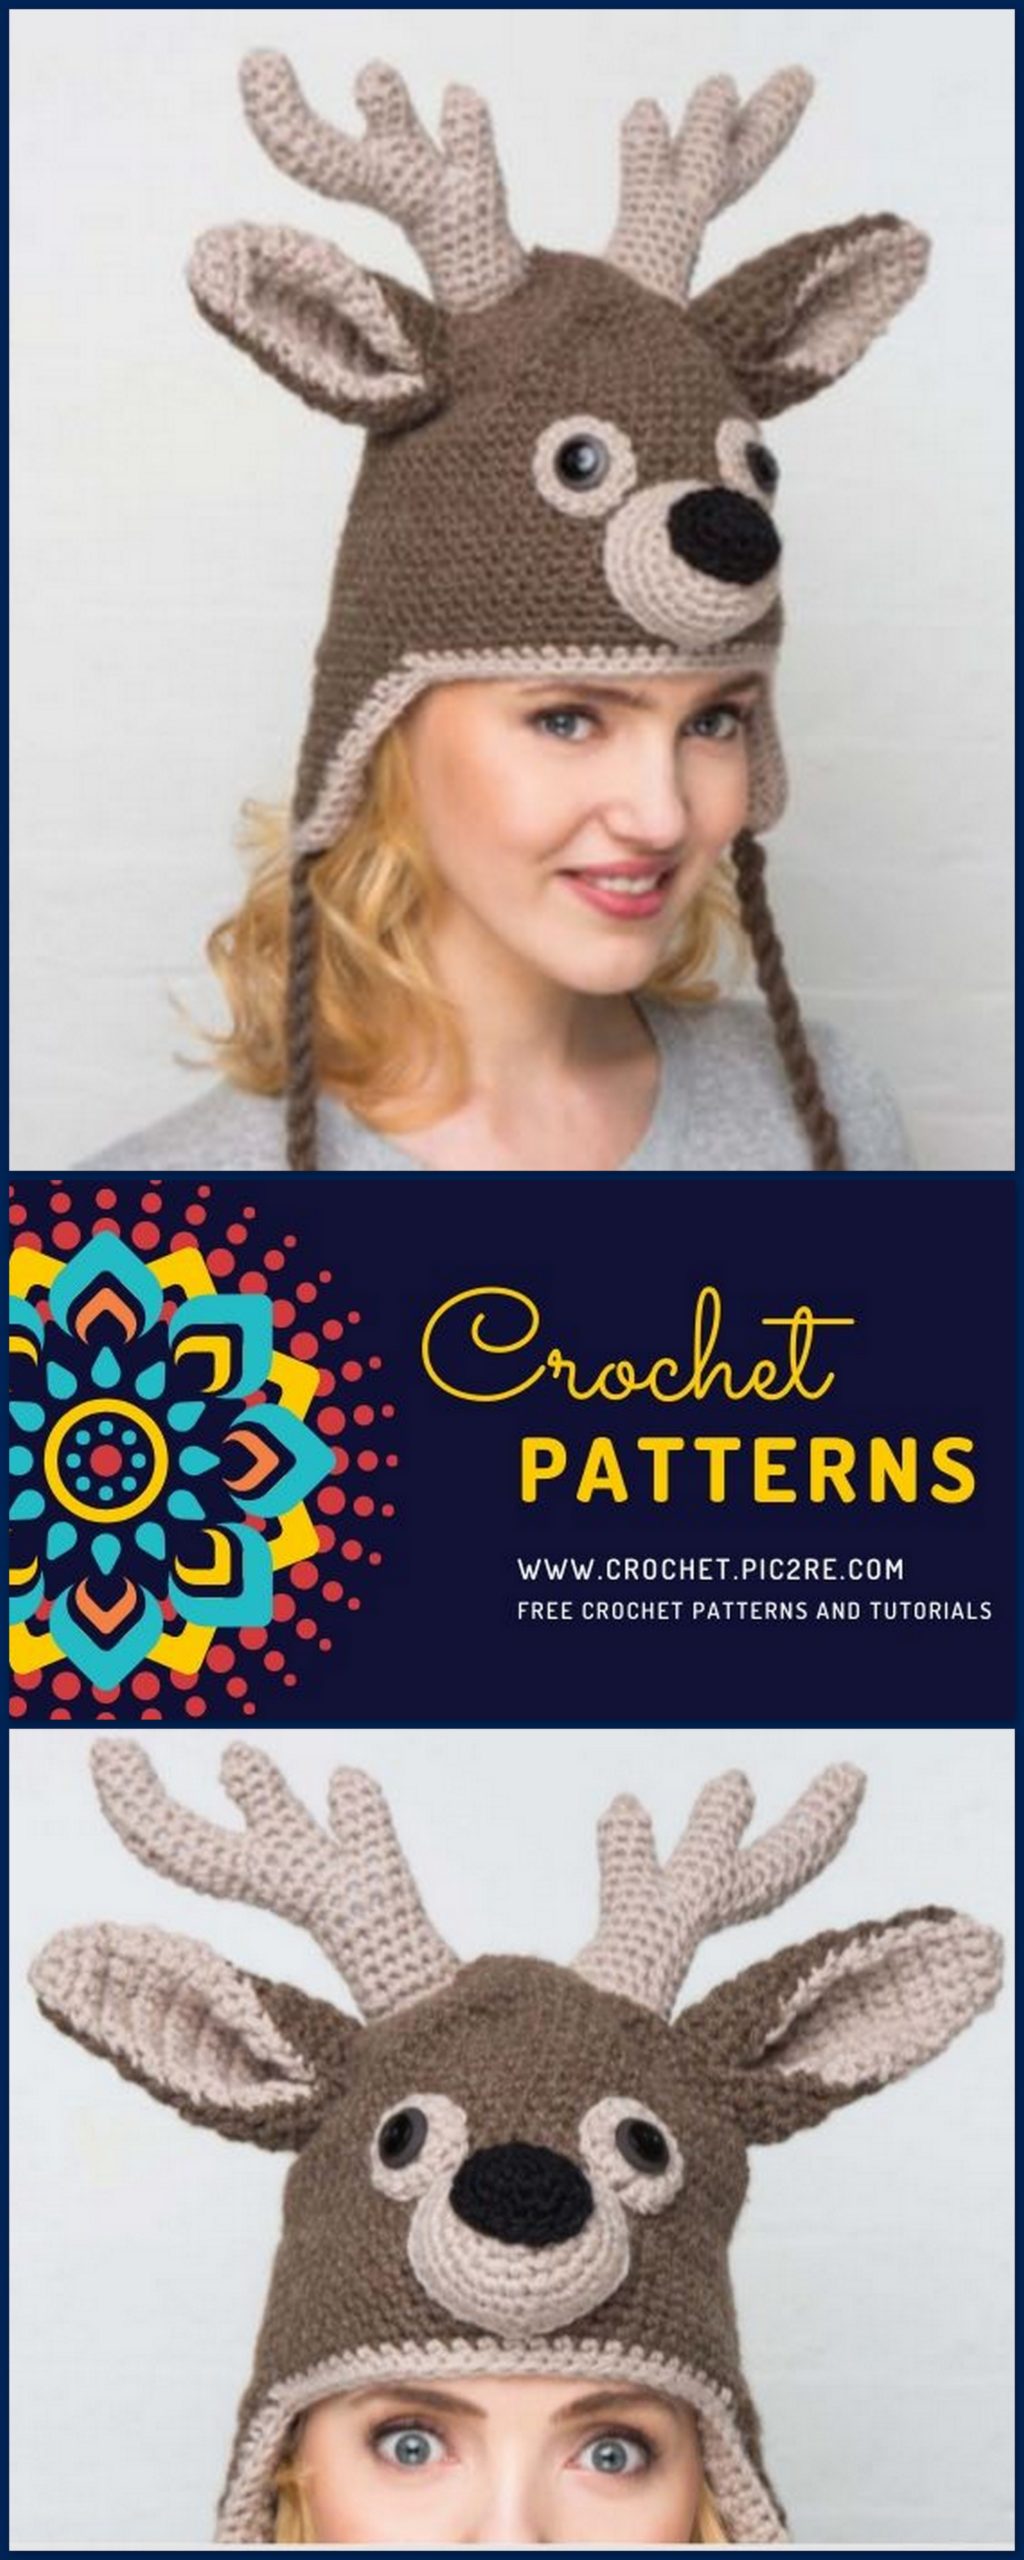
Amigurumi Deer Beret Free Crochet Pattern
We share a beautiful beret pattern for both adults and children. It will protect your head and ears from the cold in winter. Follow us for Amigurumi leopard beret pattern and more patterns.
Here is the perfect accessory to keep you warm on a breezy walk in the forest. Topped with a pair of antlers, this doe-eyed woodland creature is crocheted in a lightweight yarn.
MATERIALS
King Cole Magnum Lightweight Chunky 25% wool, 75% acrylic (120yd/110m per 100g ball)
2[2] x 100g balls in 366 Brown (A)
1[2] x 100g ball in 316 Pebble (B)
1[1] x 100g ball in 187 Charcoal (C)
4.5mm (UK7:US7) and 5.5mm (UK5:USI/9) crochet hooks
2 x dark brown ¾[⅞]in (2[2.25]cm) diameter buttons
2 x black ½[⅝]in (1.25[1.5]cm) diameter buttons
Darning needle
Sewing needle
Black thread
Small amount of toy stuffing
Thin card to make tassels
SIZES
To fit: child, up to 20in (51cm) head circumference [adult, up to 22in (56cm) head circumference]
TENSION
13 sts and 14 rows to 4in (10cm) over double crochet on 5.5mm hook. Use larger or smaller hook if necessary to obtain correct tension.
METHOD
The main piece is crocheted in rounds of double crochet with the earfl aps worked in rows. The ears are made in two pieces each, crocheted in rows and stitched together before attaching to the hat. Unlike the ears in most of the other projects, they are not stuff ed at all. The antlers, muzzle and nose are crocheted on a smaller hook to produce a tighter stitch and denser fabric. The antlers and muzzle are stuff ed, and the hat is fi nished off with button eyes stitched over crocheted patches, and large tassels hanging from twisted cords.
MAIN PIECE
Both sizes
Starting at the top of the hat, with 5.5mm hook and A, follow the pattern for the leopard hat main piece on page 14.
Earflap facings (make 2)
Omit if you plan to add a crocheted lining.
Both sizes
With 5.5mm hook and B, follow the earfl ap facing pattern as for the leopard hat on page 18.
Edging
With 4.5mm hook and B, follow edging pattern for the earfl ap facing on page 18.
EARS (MAKE 2)
Both sizes
With 5.5mm hook and A, make 2 ch. Work rows 1–10 of the rabbit ears pattern on page 134.
Adult size only
Next: 1 ch (does not count as a st), work 1 dc in each dc, turn.
Next (inc): 1 ch (does not count as a st), dc2inc, 1 dc in next 11 dc, dc2inc, turn (15 sts).
Next: 1 ch (does not count as a st), work 1 dc in each dc, turn.
Next (inc): 1 ch (does not count as a st), dc2inc, 1 dc in next 13 dc, dc2inc, turn (17 sts).
Both sizes
Next: 1 ch (does not count as a st), work 1 dc in each dc, turn. Rep last row 3 more times. Fasten off , leaving a long length of yarn at the end.


INNER EARS (MAKE 2)
Both sizes
With 5.5mm hook and B, make 2 ch. Work rows 1–10 of the rabbit inner ears pattern on page 136.
Adult size only
Next (inc): 1 ch (does not count as a st), dc2inc, 1 dc in next 7 dc, dc2inc, turn (11 sts).
Next: 1 ch (does not count as a st), work 1 dc in each dc, turn. Rep last row once.
Next: 1 ch (does not count as a st), dc2inc, 1 dc in next 9 dc, dc2inc, turn (13 sts).
Both sizes
Next: 1 ch (does not count as a st), work 1 dc in each dc, turn. Rep last row 3 more times.
Fasten off , leaving a long length of yarn at the end.
ANTLERS (MAKE 2)
Both sizes
With 4.5mm hook and B, make 15 ch and sl st to fi rst ch to form a ring.
Round 1: 1 ch (does not count as a st), work 18 dc into ring, sl st into fi rst dc (18 sts).
Round 2 (dec): 1 ch (does not count as a st), (dc2dec, 4 dc) 3 times, sl st into fi rst dc (15 sts).
Round 3 (dec): 1 ch (does not count as a st), (dc2dec, 3 dc) 3 times, sl st into fi rst dc (12 sts).
Round 4: 1 ch (does not count as a st), work 1 dc in each dc, sl st into fi rst dc.
Next: Rep last round 2[4] more times.
Divide for first point
Next: 1 ch (does not count as a st), (dc2inc) 3 times, miss 6 dc, (dc2inc) 3 times, sl st into fi rst dc. Continue on these 12 sts.
Next: 1 ch (does not count as a st), work 1 dc in each dc, sl st into fi rst dc.
Next: Rep last round 1[2] more times.
Divide for second point
Next: 1 ch (does not count as a st), dc2inc, work 1 dc in next 2 dc, miss next 6 dc, dc2inc, work 1 dc in next 2 dc, sl st into fi rst dc.
Continue on these 8 sts.
Next: 1 ch (does not count as a st), work 1 dc in each dc, sl st into fi rst dc.
Next: Rep last round 3[4] more times.
Shape top of antler
Next: 1 ch (does not count as a st), dc2dec, work 1 dc in next dc, (dc2inc) twice, work 1 dc in next dc, dc2dec, sl st into fi rst dc.
Next: Rep last round 2 more times.
Next (dec): 1 ch (does not count as a st), dc2dec, work 1 dc in next 4 dc, dc2dec, sl st into fi rst dc (6 sts). Break yarn and weave through the last round of stitches, draw up to gather and fasten off .
Finish first and second points Rejoin yarn to remaining round of 6 sts after dividing for the second point.
*Next: 1 ch (does not count as a st), work 1 dc in each dc, sl st into fi rst dc. Rep last round 3[4] more times. Break yarn and weave through the last round of stitches, draw up to gather and fasten off .*
Rejoin yarn to the 6 sts remaining for the fi rst point. Rep from * to *.
EYE PATCHES (MAKE 2)
Both sizes
Starting at the centre of the patch, with 4.5mm hook and B, make 4 ch and sl st to fi rst ch to form a ring.
Round 1: 1 ch (does not count as a st), work 8 dc into ring, sl st into fi rst dc (8 sts).
Round 2 (inc): 1 ch (does not count as a st), (dc2inc) 8 times, sl st into fi rst dc (16 sts).
Fasten off , leaving a long length of yarn.
MUZZLE
Both sizes
With 4.5mm hook and B, make 4 ch and sl st to fi rst ch to form a ring.
Round 1: 1 ch (does not count as a st), work 6 dc into ring, sl st into fi rst dc (6 sts).
Round 2 (inc): 1 ch (does not count as a st), (dc2inc) 6 times, sl st into fi rst dc (12 sts).
Round 3 (inc): 1 ch (does not count as a st), (dc2inc, 1 dc) 6 times, sl st into fi rst dc (18 sts).
Child size only
Next: 1 ch (does not count as a st), work 1 dc in each dc, sl st into fi rst dc.
Both sizes
Next (inc): 1 ch (does not count as a st), (dc2inc, 2 dc) 6 times, sl st into fi rst dc (24 sts).
Next: 1 ch (does not count as a st), work 1 dc in each dc, sl st into fi rst dc.
Adult size only
Next (inc): 1 ch (does not count as a st), (dc2inc, 3 dc) 6 times, sl st into fi rst dc (30 sts).
Next: 1 ch (does not count as a st), work 1 dc in each dc, sl st into first dc.
Fasten off , leaving a long length of yarn at the end.
NOSE
Both sizes
With 4.5mm hook and C, make 5 ch.
Round 1: 1 dc into second ch from hook, 1 dc in next 2 ch, 2 dc in end ch, 1 dc down reverse side of ch, sl st into fi rst dc (8 sts).
Round 2 (inc): 1 ch (does not count as a st), (dc2inc, 2 dc, dc2inc) twice, sl st into fi rst dc (12 sts).
Adult size only
Round 3 (inc): 1 ch (does not count as a st), (dc2inc, 4 dc, dc2inc) twice, sl st into fi rst dc (16 sts).
Fasten off , leaving a long length of yarn at the end.
MAKING UP
Edging
With right side of work facing, using 4.5mm hook and B, rejoin yarn to the back of the hat by the second earfl ap and follow the edging pattern as for the leopard hat on page 23.
Muzzle and nose
Use the long length of yarn left after fastening off to stitch the muzzle to the front of the hat, positioning it just above the edging, leaving a small opening. Push some stuffi ng into the opening to shape the muzzle before stitching it down. Sew the nose in place, horizontally, just above the centre of the muzzle.
Antlers and ears
With RS together sew the inner to the outer ear, leaving lower edge open. Turn RS out, positioning the inner ear so it sits centrally with a slight overlap each side of the larger outer piece. Join the lower edges. Bring the two corners of each side from the lower edge of the ear to the middle to shape. Stitch to hold in place. Attach to the main section of the hat, sewing all around the lower edge to keep them securely in place. Stuff the antlers fi rmly, using a pencil or knitting needle to push the stuffi ng right into the ends. Sew to the top of the hat, in between the ears, stitching all around the lower edges.
Finishing touches
If making a crocheted lining, attach the twisted cords to the hat after inserting the lining. Sew the patches to the hat, just above the muzzle with the wrong sides facing up. Place the small black buttons over the larger brown buttons and sew in place over the patches for the eyes. Weave in all the yarn ends. Make two twisted cords (see page 154) using A, each measuring 8[12]in (20[30]cm) long, using 6[8] strands of yarn. Make two tassels (see page 155) measuring 4[5⅛]in (10[13] cm) long in C, and attach each to one end of the twisted cord. Stitch the other end of the cord to the tip of the earflap.
LINING
See pages 142–5 for how to make and attach a cosy fl eece or crocheted lining.